I'm lazy, there's no denying it. If I have to do more then 10 minutes of adjusting on a photo, then it's not a good photo to start with and I'll move on to a different image. Almost all of the images in my
portfolio (excluding the
tiny planets) were adjusted in under 10 minutes. With that being said, after reading through several tutorials on tilt-shift manipulation, I figured I would write my own tutorial which is faster & easier then doing masking/ gradient tool / time consuming crap and you get the same end result. The following tutorial will work in Photoshop Elements or the pro version.

First: Open the image and duplicate the background layer. (command + J on a mac)
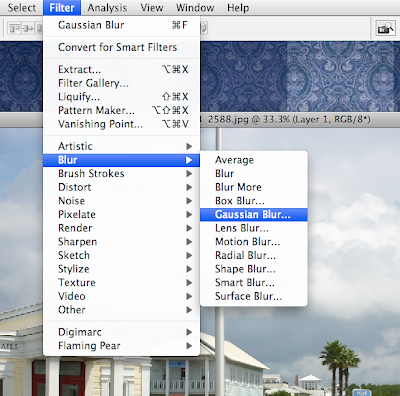
Second: Apply a Gaussian Blur to the duplicated layer
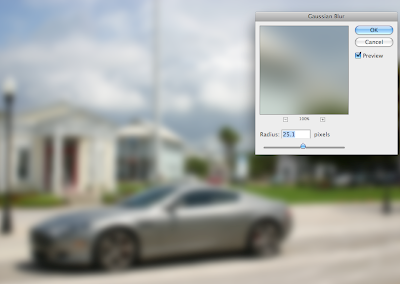
Third: Depending on the image, adjust the radius of the blur, make sure you can still kinda tell what is going on in the background.
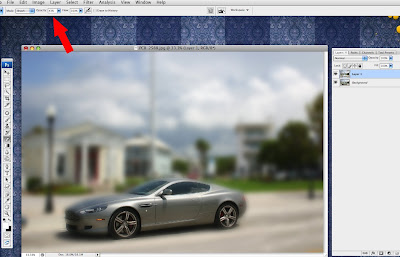
Fourth: Select the eraser tool and adjust your brush opacity. Make sure that you are using a brush with a soft edge as it will blend better. I started out with the opacity at 100% with a small brush size, maybe the size of a dime, then as I make the brush bigger, I decrease the brush opacity. (the bracket keys " [ ] " will adjust a brush size instead of using the slider at the top)
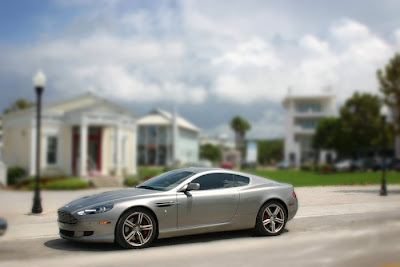
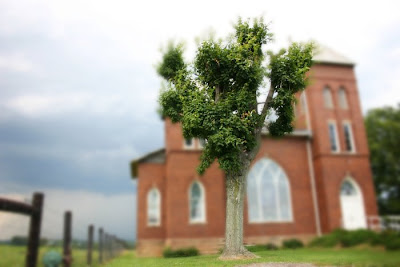
Above is the final image. As long as you keep thinking to yourself "what would this look like if it was a model and I was using a macro lens?" you should be in good shape.

Below are some more examples of tilt-shift that I did in two minutes. All of the images I've had for awhile and didn't really care for. It's a nice surprise to see what can be done with unexciting photos.
 First: Open the image and duplicate the background layer. (command + J on a mac)
 Second: Apply a Gaussian Blur to the duplicated layer
 Third: Depending on the image, adjust the radius of the blur, make sure you can still kinda tell what is going on in the background.
 Fourth: Select the eraser tool and adjust your brush opacity. Make sure that you are using a brush with a soft edge as it will blend better. I started out with the opacity at 100% with a small brush size, maybe the size of a dime, then as I make the brush bigger, I decrease the brush opacity. (the bracket keys " [ ] " will adjust a brush size instead of using the slider at the top)
 Above is the final image. As long as you keep thinking to yourself "what would this look like if it was a model and I was using a macro lens?" you should be in good shape.
  Below are some more examples of tilt-shift that I did in two minutes. All of the images I've had for awhile and didn't really care for. It's a nice surprise to see what can be done with unexciting photos.


